Wednesday, February 26, 2014

Curvy thingsI

So this project actually started about 3 years ago.  For my wife's birthday or Christmas present several year ago, I purchased a print of a Micheal Birawer painting.  Not wanting to spend the additional dollars on a frame, I gave her the print and said I would make a frame.  So finally in January of this year, I decided it was time to actually start and complete the frame.  My timeline was to give it to her on her birthday in February.

I looked around at various frames and pictures of frames and quickly realized that this painting couldn't just have any ol' straight frame.  If you think for a second about the purpose of a frame it 1) provides a means to mount the picture to the wall, 2) provide protection and 3) Enhances or shows off the painting.  

Sure I could simply tape the print to the wall and cover it with a piece of plastic, but that wouldn't enhance or show it off...in fact, that would look terrible!  So I had an idea.  After my kayak project http://marcsprojectpage.blogspot.com/  I learned that I could in fact take a bunch of really nice straight cut and planed boards and turn them into something not straight.  I decided that this painting needed a not-straight-frame.  I needed it to provide a means to hang the print, protect it, and enhance it. 

So it all began.  In January I sketched a chalk outline of what I had in my head.  I took a few measurements of the print so I knew what general size I would be dealing with.  I then just drew some things up.

Chalk drawing on the wall of garage.

Scrap boards available in my shop.
Pine, African Mahogany and maple.
 I decided I wanted to bring some color to the frame by inlaying the mahogany and maple.  To do this I ripped strips of each and glued them in no particular fashion between the strips of pine.


I then laid the print in to get a feel for how it would look.

I then mitered the corners and glued it up.
Yes, I did have enough clamps!

To give the corners strength, I added a spline to each of the corners.
 As with past projects of mine, I like to challenge myself to not use fasteners during assembly.  For this project, the only mechanical fasteners are the screws which hold the wire mounting cable in place on the backside of the frame.  I used only glue and a spline for strength in the corners.
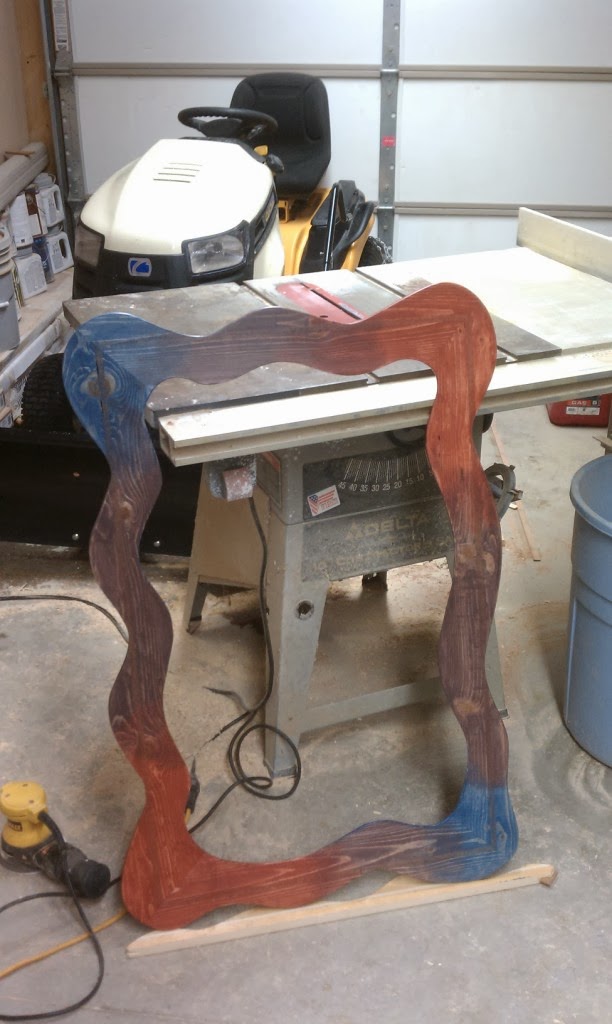
Curvy outline drawn on the assembly.
I used my jig saw to cut away the excess wood.

Ta-da!!
My shop helper.


 Next came the staining.  Since the print is a blend of colors I thought it would be good to use multiple colors of stains.  I purchased a blue and red wiping stain.  For the purple, I mixed them together.  This kind of work and the result was sort of purple.

Prior to staining I dado-ed the back to accept the mat and glass.  I used my router for this.
I then purchased the glass from my local hardware store.

The other feature I did was to literally rip the print.  As you may have noticed in the above picture of the print, there was a white boarder around it.  I didn't really like this and it would have made the frame much bigger so I decided to remove it.  I think it turned out well and the remaining white ripped boarder kind of sets the picture off of the red mat.


The finished product in my shop.  I coated the outside of the wood with varnish to protect it.


 And Voila!  The frame is complete and on the wall.  And, it was complete a day prior to her birthday.  I hung it in her office to add some color on the walls in there.  Best of all, it had been so long that she had forgotten about the print.

The whole project turned out well.  And, to my surprise, when I compared the final frame to my original chalk sketch, the resemblance surprised me!  Total 3M product count for this project = 5.  I used 3M wood glue, sandpaper, half-face respirator, ear muffs and safety glasses.

Overall it was fun.  The staining was a little messy but I liked how the colors blend into each other.  For me, this is more proof that making curvy things out of a bunch of straight things isn't as hard as it first appears.

~Marc


Tuesday, July 16, 2013

Fourth of July Launch

It Floats!!!


After a fair amount of finishing time, I finally launched my kayak.  Official launch was just before noon on July 4th, 2013 in Bass Lake located about 8 miles south of Biwabik, MN.  Bass lake has special meaning to me as we have had a family cabin on this lake for many years and was the first lake (and still my favorite) to swim in.  

I don't have the exact totals yet but I am somewhere in the 250 - 300 hour range for time, used around 24 different 3M products and just under $1000 USD for cost.  I have learned a lot during the 10 months which have passed since I started building it.  One of the biggest things, for me, was patience.  Taking time when needed and not rushing it.  There were times when I thought I could just hurry up and quickly get something done, like install just one more strip, and usually, that one didn't look good at all. 

So during the course of this build, I have been thinking of a name for my creation, and building upon my learning and my Finnish ancestry, I chose the Finnish word Maltti.  Translation to English is probably closer to presence of mind so I thought it would be a fitting name for this watercraft.  

I do have some more pictures to post about the fiberglassing and finishing so for those interested, I will write another post which will get into more details.  For now, here are more pictures of the finished craft.


St. Croix river view across the bow.

Standing on end to complete the "end pour."

On top of our car for the maiden voyage to Bass Lake. 

Glassing complete, ready to go.

Monday, June 24, 2013

Nearing the end!

As with previous posts, it has been some time since my last one!  But, I have been making solid progress.  This post will be short on the words and heavy on the pictures.  To quickly summarize, I have completed stripping of the deck, sanding, fiber-glassing/epoxying, building the cockpit and cutting the hatches.
I have yet to epoxy the inside of the deck, join it with the hull, varnish the entire outside, then launch.  Ok, maybe there are a few other minor details in there but those are the major steps.

My 3M product usage count is now up to 21.  I added a 1/2 face respirator, organic vapor cartridges,  a Bondo scraping tool and a tack cloth.  I've got plans for at least 4 more products and when I am all complete, I will publish the entire list.

Enjoy! The next post should be soon and will include some launch pictures.
Marc
First strips of the deck

The completed deck
The cockpit cutout and recess
Completed Combing


Glassed Hull
Glassed Deck

The rear hatch cutout

Front hatch cut out with gasket recess

Building the combing lip.  Yes, I did use every clamp in my shop!

I will add some cheek plates to the inside of the cockpit, then I'll get it all 'glassed.  I can then join the deck and hull, add the bulkheads, some gaskets on the hatches along with their hold downs, varnish it, then launch.

Thursday, February 28, 2013

1/2 complete with the 2nd 3rd

Again it has been some time since my last post (beginning of December) but progress has been made.  So far I have completed stripping the hull.  This marks a milestone for me as I am now, what I like to say, half way through the second third of the project.

Completed hull
I have divided up the project into three parts.  The first part being the form building and strip cutting.  The second part is the strip installation.  The final part is the finishing.  Since at this point I am complete with stripping the hull, I consider this 1/2 way through the 2nd 1/3.  It makes sense to me!

The final strip installation on the hull.
These final strips took a little bit of fitting, but, they went in and look great.  It is amazing how much easier a sharp plane shapes the wood.  I thought a video of all of the stills which I have taken of stripping the hull.  Enjoy!


I have completed planing and rough sanding. The differences in the redwood and cedar are readily apparent and the beauty of the wood is showing.  I plan to come back to finish sand the hull just prior to fiber-glassing.
Shavings from planing.


Here is a video of me turning the kayak over on it's stands.  I still need to modify the stands a little to avoid the sharp contact points on the hull.  I plan to cut a couple of curved pieces underneath the hull and attach these to the stands.


With previous posts, I have been keeping track of the different 3M products being used.  My total count of different products is now up to 17.  I added the ergonomic sanding block to my list of products.  Surprisingly enough, I did not own a hand sanding block.  So, with a recent trip to the company store, I saw this and purchased it.  It fits my hand well but the only minor problem with it is that ,to me, the spikes which hold the sandpaper onto it are placed too far into the cut outs.  I almost need three hands to attach the paper, but in the end, it works as a sanding block should.


Lastly, I have been thinking that I need a name for my creation.  Since most boats have names, I have begun thinking about what to name it.  I have a couple I am considering and I am open to sugestions.  Feel free to leave a comment if you have a suggestion for a name. Stay tuned for more info.  The name reveal will come out during the initial launch which I am hoping to do sometime around the end of May or early June.

Until next time...
Marc

Sunday, December 9, 2012

The installation begins

Strip installation has begun!  And now the boat is starting to show the shape of itself.  With every strip that goes on, I get know that I am getting closer and closer to launching it.  I know that the time and effort that I put into it will conclude with a great reward of paddling it for the first time.  As I write this post today we have received a significant about of snow.  Here is a view from out our patio door onto the deck.  So far, it looks like about 14 inches has fallen.  Two good things from this, one, I can go snow shoeing, two, when it all melts there will be water to paddle in.


For this post I decided that I would display a lot of pictures.  I feel that previous posts have been lacking pictures so without further ado, here they are.
The first strip.
I used my hand plane to remove the bead from one side.
 I installed the first one cove side up and held it in place with hot melt.

The second and third strips.  Between the strips I am using 3M Blue Painters Tape.
This helps to squeeze the glue out and it removed easily. Of course, as mentioned in previous posts, I
am using 3M wood glue for the strips. I apply this down the bead.

Just enough clamps.

A close up view of the clamp block holding the strips to the  forms.


A view from the opposite end.

Up to about 9 or 10 strips at this point.

The Keel Strip installation.  This one has taken some fitting to  install.
So this is my current progress.  So far things have been moving along pretty well.  Now comes the work of fitting the strips into each other unlike the first several courses where I could just run them long and then cut the ends off.

By the time my next post rolls around I hope to be complete with the hull and then moving on to stripping the deck.  The anticipation of the first paddle stroke in the water keeps building...

Monday, December 3, 2012

Milling strips

Well again it has been some time since my last post but I have accomplished quite a bit in the last couple of months.  After finishing ripping all of the strips, next was the milling of the cove and bead on each strip.  I set up my router first with the bead bit, then the cove.  WHY?  Well the bead can take more abuse than the thin edges of the cove so it is best to do that first.

Here is a video of the milling.

After completion, I counted all of the strips and came up with about 140 total.  Doing the math this comes out to just over 1200 feet or almost 1/4 mile!  I thought that was pretty good.

Installing the first strip:
The next step was putting on the first strip.  Using my newly sharpened block plane, I planned down the strip so that it would bend nicely to the shape of the boat.

And just like that the first strip was on.  Ok, it may have been a little more work than that but it is now looking good.  At this point I consider myself about 1/3 of the way through the project.  The first 1/3 being the form building and milling the strips, the second being installation of the strips, and the final 1/3 being finishing.

I also added a couple of 3M products to my list.  One was a 3M half face respirator with the P100 particulate filters installed.  I used this when ripping and routing the strips so I didn't have to suck in the cedar dust.  The next was a 3M hot melt applicator (glue gun) and 3M hot melt glue.  So counting these as 4 different products brings my total 3M product usage up to 16.  Pretty good for being 1/3 of the way through.

Hot melt applied to the back side of the strips to hold them to the forms.
I have decided that I will not use any fasteners (brads or staples) on this project as I don't want any small holes to deal with later on.  Also, I don't think it would look to nice to have a bunch of small staples holes scattered across the surface of the strips.  This is the reason for using the hot melt.  Once complete with the stripping, I will break the forms out and remove the hot melt.  Sounds easy!

Now I continue placing strips on as I have time.  It is actually kind of fun as it clears my thoughts as I can focus on the task at hand.  I've got plenty of details to post about strip installation so I will save that for next time.  Hopefully soon.  So far I have been pleased with my progress.  It hasn't been too difficult so far.  I have taken time, set things up correctly and once the steps are broken down, they go quite well.